Tips and tools for WordPress, Google and more

Set up Google Tag Manager server-side tracking with Google Cloud Run
Client-side tracking is out, long live server-side tracking. But - phew - it's not easy. A guide.
Get yourself a hot cup of tea (hello, Mai Thi), put your smartphone on silent and check whether there is any sparkling wine or Prosecco in the fridge to celebrate your success. Then you're ready to go.
Table of Contents
- Prerequisites
- Terms
- Sources of the instructions
- Create a Google Cloud project
- Setting up Cloud Run in the Google Cloud
- Tests / Preview
- And afterwards
- Excursus: Adding your own tracking subdomain to a Google Cloud service
- Your turn
- Do you need support?
Prerequisites
You know what it's all about. You want to lose less data during tracking, reduce any tracking brakes in the website and be able to act flexibly. That's why you want to say goodbye to client-side tracking and switch to server-side tracking.
What you need to set up server-side tracking with the Google Cloud:
- One Tracking domaini.e. usually a subdomain of your domain (e.g. https://metrics.IhreDomain.com)
- A Google Cloud Project - here you set up the tagging server
- One Credit card as an indication of the payment method in the billing account in the Google Cloud
- One Google Tag Manager (GTM) server container
- One Google Tag Manager (GTM) web container
- One Google Analytics 4 Property
Tip:
I recommend that during the set-up phase, an accompanying Text file (*.txt), in which you will enter important information and data during the setup process.
The following data will be generated or required in the course of your work:
| Cloud project ID | |
| GA4 Measurement ID | |
| GTM Webcontainer ID | |
| GTM Server Container ID | |
| Container configuration | |
| Preview server URL | |
| Tagging Server URL | |
| Tracking subdomain |
Tip:
To be able to continue to see your website traffic in your GA4 property as usual without disruption, it is best to create a new (temporary) GA4 property for server-side tagging, for example with the name [YourDomain.com] SST. You then only use the measurement ID of this new property for server-side tracking.
To be on the safe side, you should also create a new web container in your Google Tag Manager (GTM) account. This would completely separate the server-side tagging from the previous implementation for the time being. Of course, you will need to integrate the new container code into your website in addition to the existing code.
Only after a longer control phase would you replace the new GA4 measurement ID with the previously used measurement ID in the GA4 tag (more on this below). The data will then end up back in the previous GA4 property and you can delete the temporary property.
In these instructions, I assume that there is already a functioning GA4 Day in a Google Tag Manager container that stores data in a Google Analytics 4 Property sends. I refer to this GTM container as Web container.
Terms
Server-side tracking requires a tagging server and two Google Tag Manager containers:
Tagging Server
This server runs in the Google Cloud (or a platform from another provider). The server container of the Google Tag Manager is located in the tagging server. Ideally, you should use your own Tracking subdomain as the URL of the tagging server, thus avoiding the Google Cloud Server original address in the form of https://1a2b3c-4d5e6f.uc.r.appspot.com.
You will probably have to set up your own tracking subdomain (e.g. metrics.yourdomain.com) first (see Digression at the end of the article).
Web container
The GTM web container contains the web-side GA4 tag, which basically sends data to Google Analytics 4. However, with server-side tracking, the data is no longer sent directly to Google Analytics 4, but first to a client located in the GTM server container on the tagging server.
Server container
The GTM server container is set up in the tagging server. It contains a client that receives the GA4 tag requests from the web container.
Client
The client is located in the server container on the tagging server. It should receive the requests that arrive from the web container and possibly manipulate them (e.g. remove the IP address) before forwarding the requests to the server-side GA4 tag or the server-side Google Ads conversion tag (such data manipulation can be done with Transformations are made). Only the server-side GA4 tag or the server-side Google Ads conversion tag transmit the - possibly transformed - data to Google Analytics 4 or Google Ads.
Transformations
You can set up transformations to manipulate (reduce or enrich) the data before it is sent to Google Analytics 4.

Sources of the instructions
These instructions are based on the Original sources in Google Developers area - in the guidance of Michaela Linhart and Matthias Hausdorf. You can also find more explanatory details there if you need them.
Another important source is the article by Julius Fedorovicius (Analytics mania): „Introduction to Server-side tracking in GTM“.
There are of course many more articles and instructions on the subject, but you should note the date of the articles. Some screenshots no longer correspond to the current (February 2024) reality.
Create a Google Cloud project
Use the URL https://console.cloud.google.com/projectcreate and create a new project in the Google Cloud. The tagging server will later be created in this project.
Den Namen können Sie frei vergeben (im Beispiel endet er mit „SST Cloud Run“).
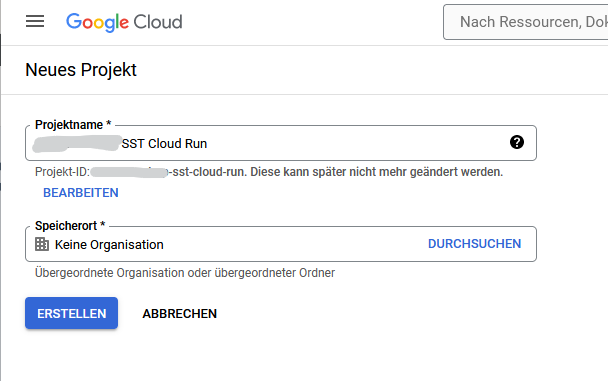
Im gezeigten Beispiel endet die Projekt ID mit „…-sst-cloud-run“. Die Projekt-ID speichere ich in der Notiz Text-Datei ab (s.o.), denn die Projekt-ID kann häufig später wieder benötigt werden.
Den Speicherort belassen Sie auf „Keine Organisation“.
Now it's time to set up the invoice data under https://console.cloud.google.com/billing/. Sollten Sie bereits ein Rechnungskonto haben, dann wird dieses mit Ihrem neuen Projekt bereits verknüpft sein. Im anderen Fall erstellen Sie ein neues Rechnungskonto mit Klick auf „KONTO ERSTELLEN“.

Select the correct currency and enter all the necessary company, contact and credit card details, this is the only way to actually activate billing.
In the Console Dashboard of the project you can always see all important entries.
https://console.cloud.google.com/home/dashboard?project=project-ID

In this Google Cloud project, you will later use the tagging server with Cloud Run manually.
Note:
Even if you outsource the following activities (see below), you cannot avoid creating your own project in the Google Cloud. However, you then only need to add the helpers as users with their email address.
Create the server container in Google Tag Manager
In the Google Tag Manager (https://tagmanager.google.com/#/home) to create a new container for use on the tagging server.
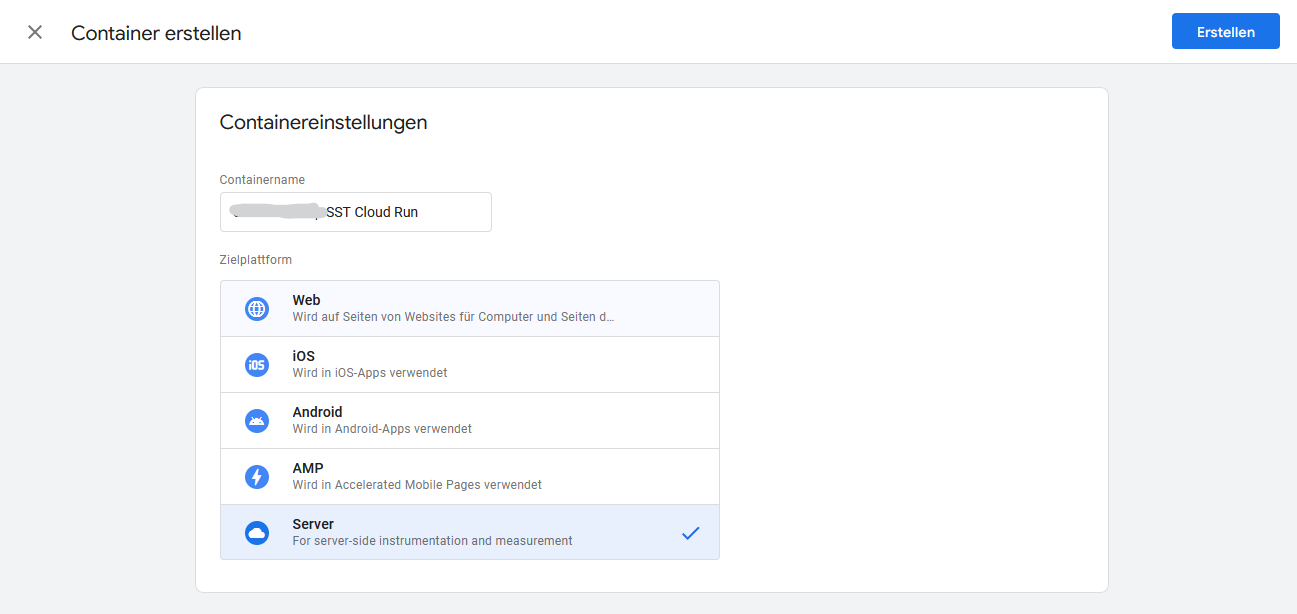
You need this server container additional to a web container. This means that a total of two containers are ultimately required in the case of server-side tagging. In the website itself only the code for the web container be installed. You will no longer find any installation code for the server container.
After creating the container, select Provide tagging server manually. Manual provisioning requires a lot more manual work (this article is rather long), but gives you full control over the service infrastructure. For example, you can leave the incoming data in Europe.
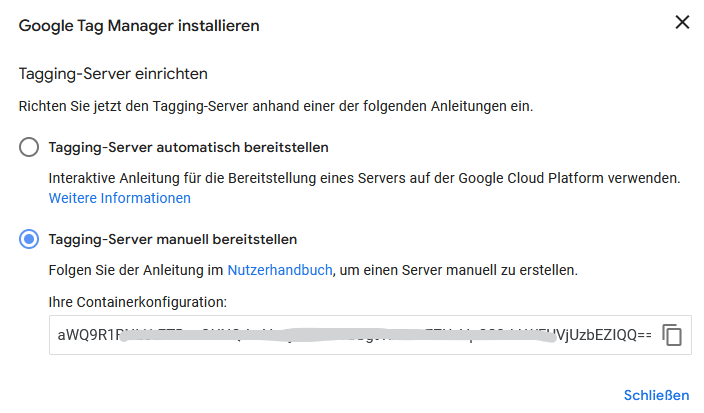
Speichern Sie den erhaltenen Code von „Ihre Containerkonfiguration“ in der prozess-begleitenden Text-Datei ab.
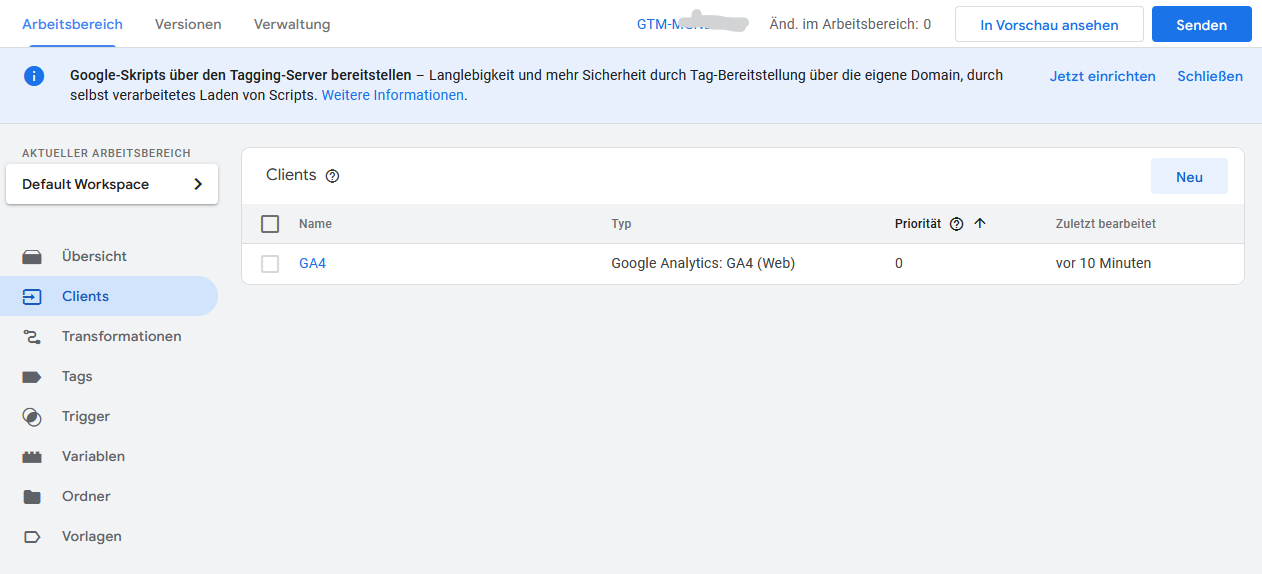
If you now call up the workspace and select the menu item Clients you will already see a client for Google Analytics 4 with the name GA4. This client will be executed later in the tagging server. It receives the data from the web-side GA4 tag and forwards it to the server-side GA4 tag. The server-side GA4 tag then forwards the data to the Google Analytics 4 property.
GA4 Day
Next, set up the GTM server container one GA4 Day with a trigger under the menu item Tags in.
The Trigger is of the trigger type User-definedand looks like this:
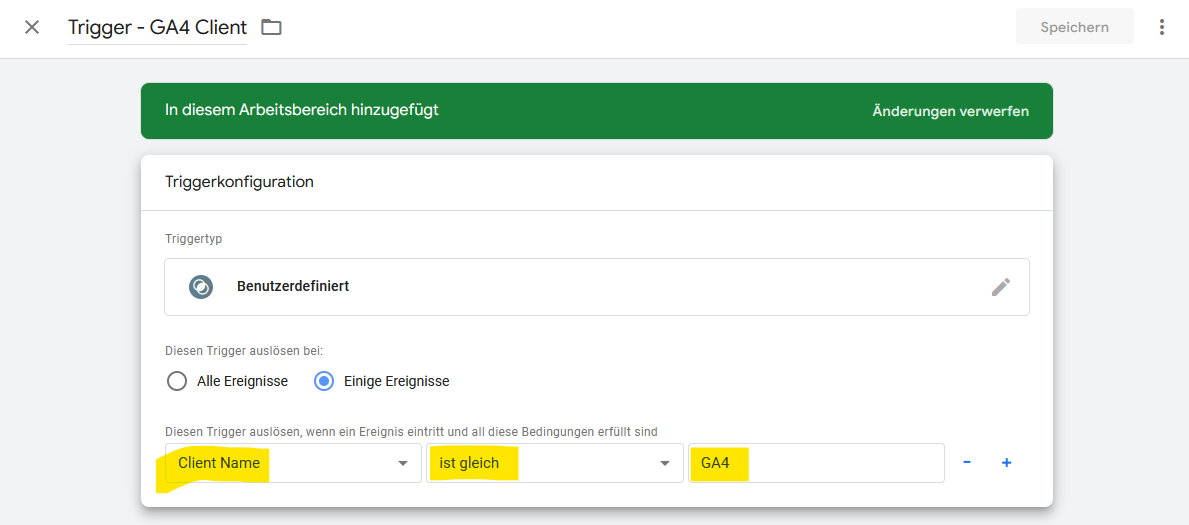
So the condition is: Client name - is the same - GA4
This means that data may only be forwarded to Google Analytics 4 if it is available from client GA4.
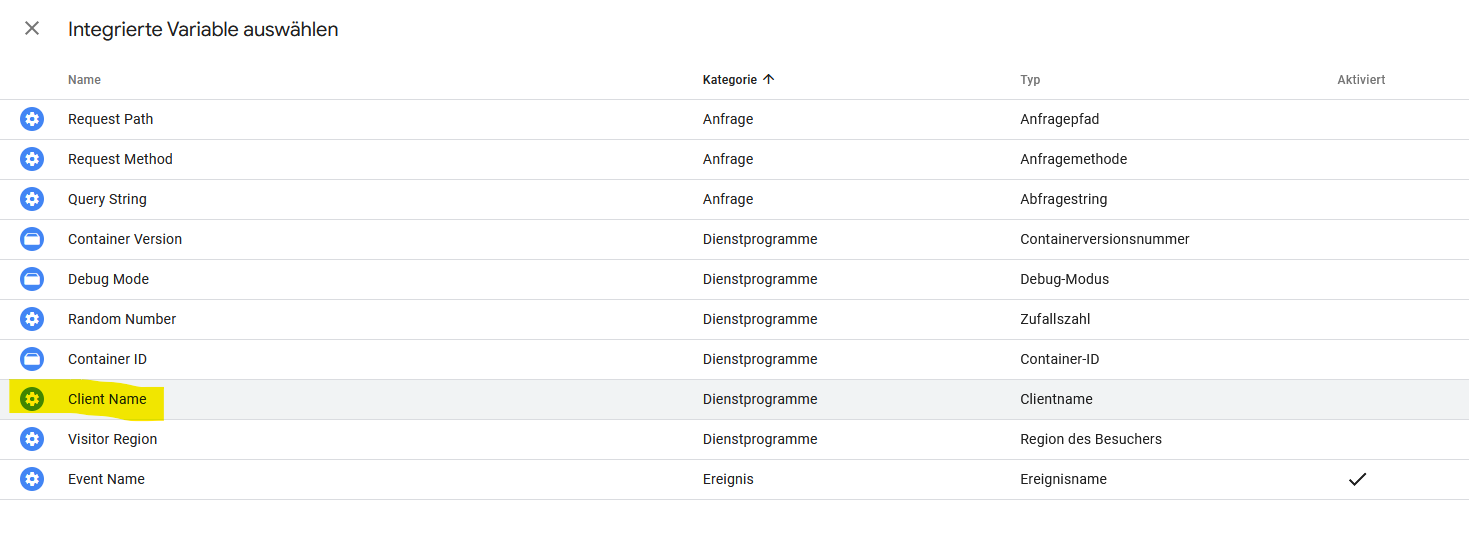
How to access the integrated variable Client Name under the conditions for Some events:

Then select the integrated variable Client Name from.
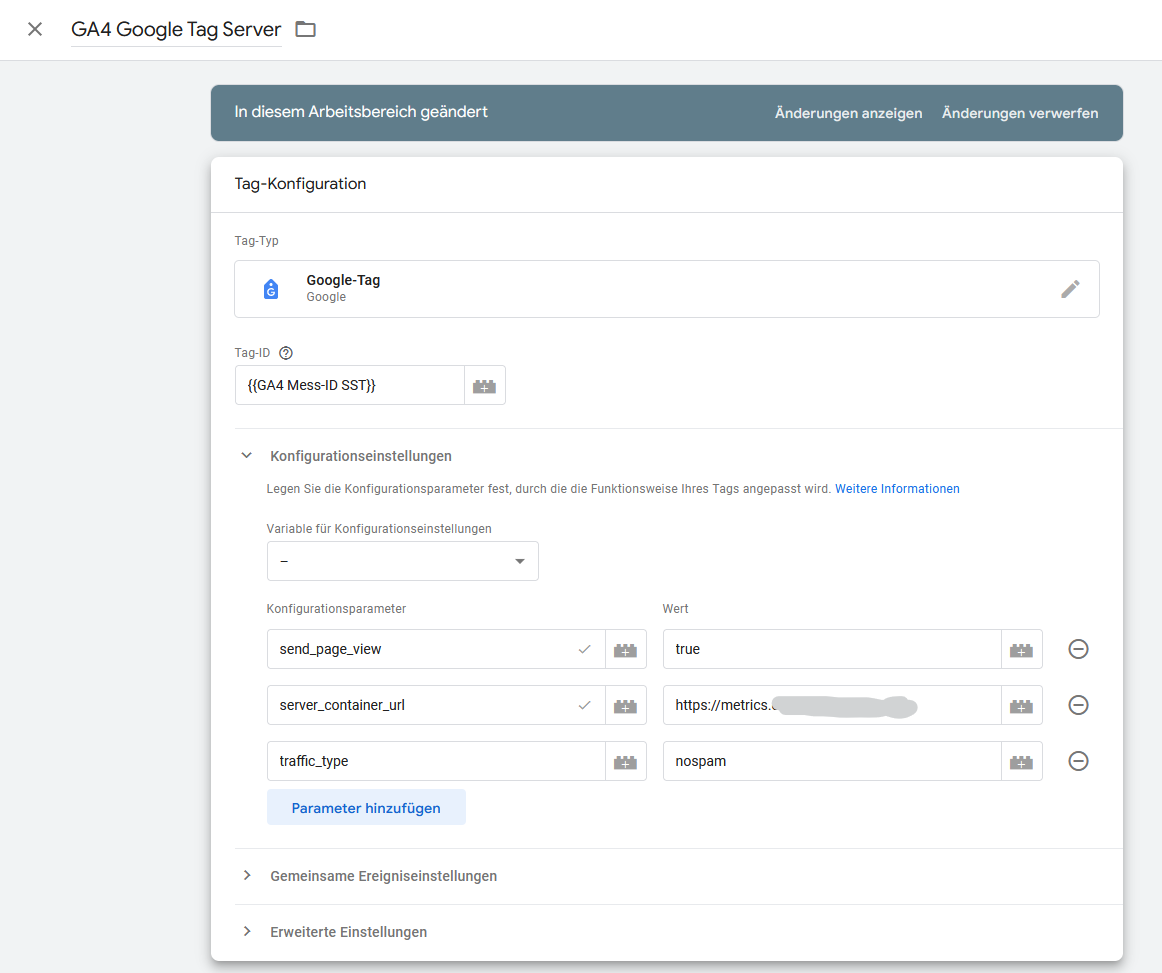
Und so sieht der serverseitige GA4 Tag aus. Die GA4 Mess-ID wird im Beispiel als Variable vom Typ „Konstante“ eingesetzt, damit kann sie später einmal zentral geändert werden.

Google Ads
You can also transfer the tag for Google Ads to the server container. In this case, you must all Google Ads conversion tags together with the Conversion Linker („Conversion-Verknüpfung“) vom GTM Web-Container in den GTM Server-Container relocateThese will therefore no longer be in the web container.
Meta Conversion API
And also for Facebook can be used to set up better tracking than the Meta Pixel with the help of a server container. The Conversion API enables a direct and more reliable connection of the marketing data of your website or online store with Meta.
More on this in the Meta Business help on the topic of Conversion API and in the corresponding Meta guide. Of course there are also detailed instructions at Thomas Hutter.
Linking web and server containers in the GTM
You should already have a Web container in the Google Tag Manager, in which a GA4 Day exists. We have assumed this. You only need to add the information to send the data to your tagging server to this tag.
Tip:
If you have followed the recommendation to create a new GA4 property for server-side tagging, you should now also leave the original GA4 tag unchanged in your GTM web container and set up a new, i.e. additional GA4 tag for server-side tagging.
You may even work with a completely new GTM web container, which you also integrate into your website, and thus completely separate the server-side tagging from the previous tracking. This also gives you the opportunity to clean up tags, triggers and variables in your Google Tag Manager.
Create a GA4 tag in your GTM web container to send data to the tagging server. This additional GA4 tag will contain the GA4 measurement ID of the data stream of your new SST property. Add the following configuration parameters to this new GA4 tag server_container_url add. Enter the full URL of your new tracking subdomain as the value. This allows the traffic to be sent to the tagging server.
If it is possible on your website, enter the Tracking subdomain in the container code instead of the server googletagmanager.com in.
(function(w,d,s,l,i){w[l]=w[l]||[];w[l].push({'gtm.start': new Date().getTime(),event:'gtm.js'});var f=d.getElementsByTagName(s)[0], j=d.createElement(s),dl=l!='dataLayer'?'&l='+l:'';j.async=true;j.src= 'https://metrics.yourdomain.com/gtm.js?id='+i+dl;f.parentNode.insertBefore(j,f); })(window,document,'script','dataLayer','GTM-ABCD1234');
If you use the highly recommended plugin GTM4WP for this, you will find the change option under Advanced.

The server-side tracking also works with www.googletagmanager.com as a tracking domain, but then you do not have the advantage of using first party cookies. These are cookies that are set by your website and are therefore usually accepted by the browsers of website visitors.
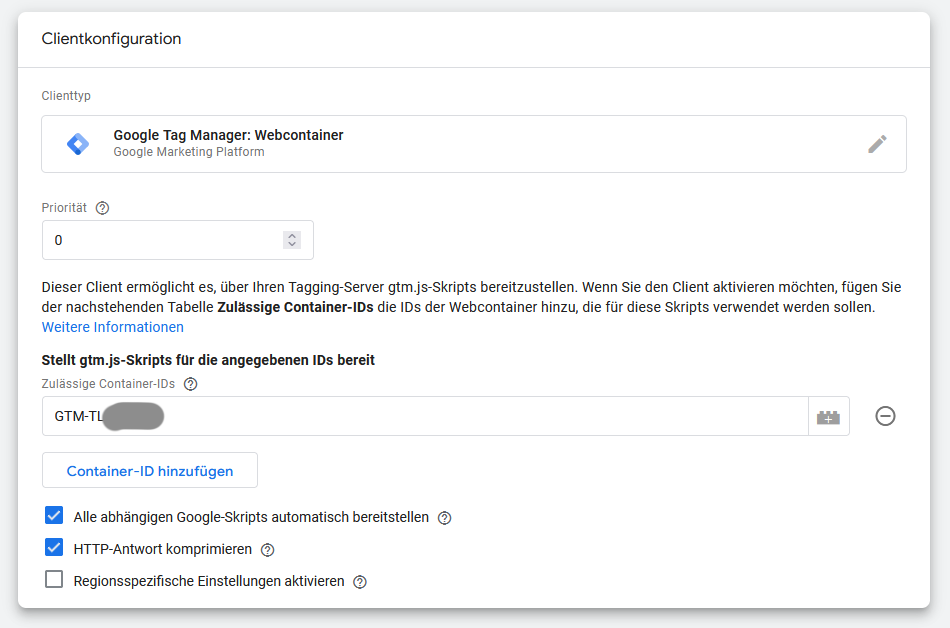
Now add the additional client "Google Tag Manager: Webcontainer" to the GTM server and enter the ID of the GTM Webcontainer in the field Permitted container IDs option. This allows the GA4 client in the server container to receive data from your web container.
Setting up Cloud Run in the Google Cloud
The use of the service Cloud Run for the installation of the Tagging Server is strongly recommended. The costs are lower than when using the service API Engineand will only amount to a few dollars per month for websites that are not heavily visited. Michaela Linhart speaks in her guide of about 5 USD/month for her blog, which is certainly well visited Analytics box.
To manually create the tagging server with Google Cloud Run, we follow the Manual setup guide from Google.
Two servers are set up:
- Preview Server (Preview Server)
- Tagging Server
Preview Server
You need your own preview server, as the GTM preview is no longer possible in the usual form with server-side tracking.
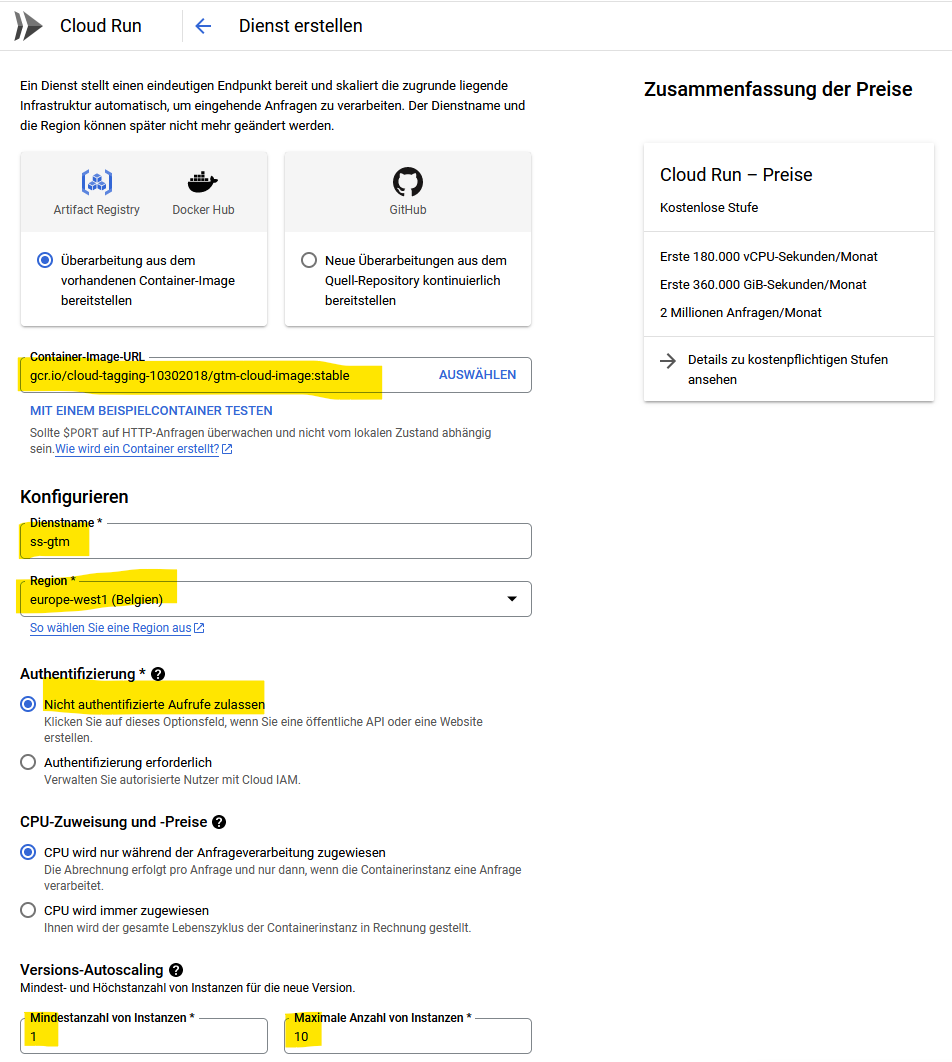
In the Google Cloud (menu item Cloud Run), create a new Google Cloud Run service (ENABLE APIS AND SERVICES).

Click NOT to use quick start.
You can now use what is known as a Docker image, which is offered by Google. Such Docker Images are a kind of container for complex applications that can be easily transported and installed as files.
Enter the following Docker Image URL under Container image URL in:
gcr.io/cloud-tagging-10302018/gtm-cloud-image:stable
Before clicking on CREATE, you must make any adjustments to the settings.
Service name: Tragen Sie eine beschreibende Bezeichnung mit „-preview“ ein (z.B. ss-gtm-preview)
Region: europe-west1 (Belgium)
Authentication: Allow unauthenticated calls
Minimum number of instances: 0
Maximum number of instances: 1

Scroll further down Containers, volumes, network, security on.
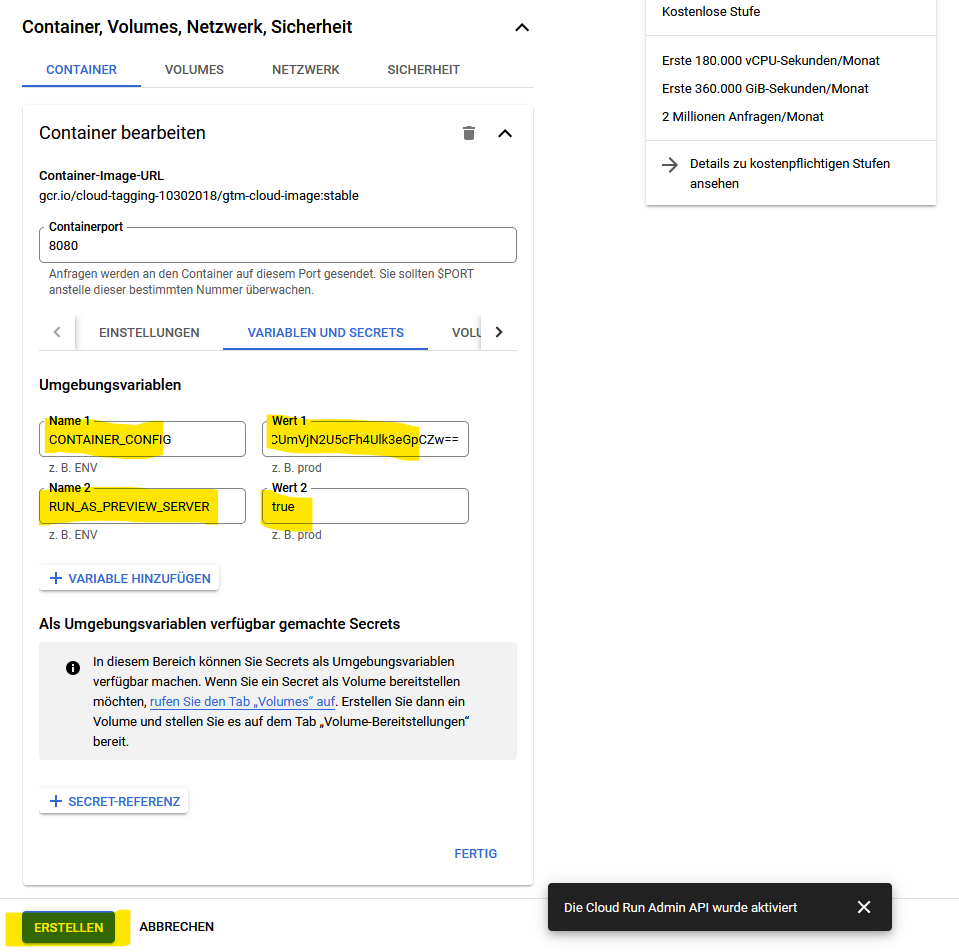
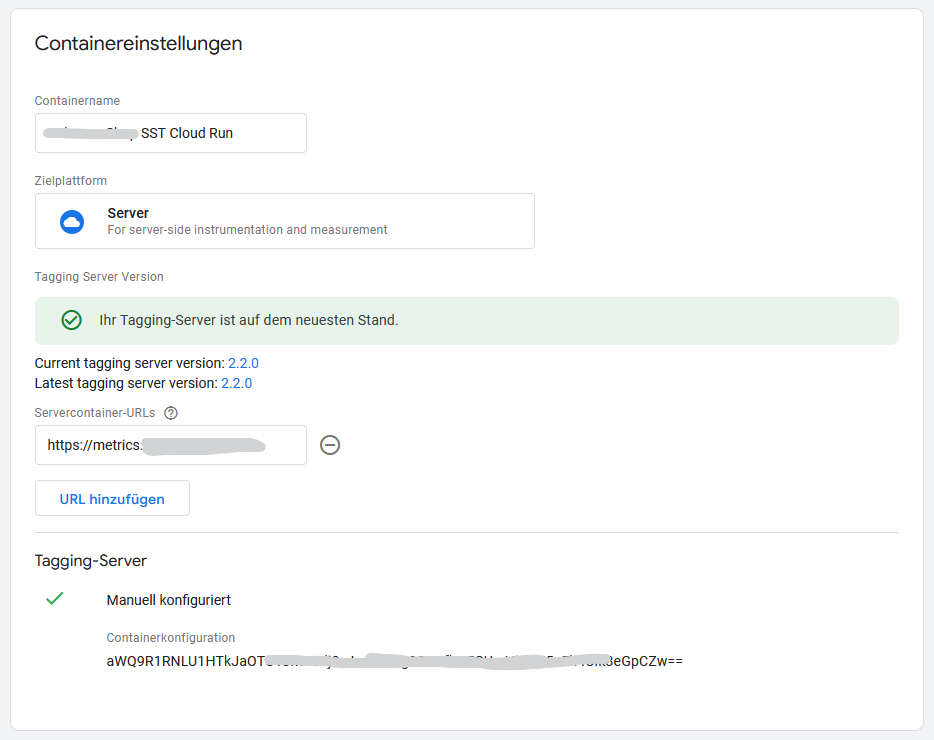
Unter „Variablen und Secrets“ tragen Sie die Variable CONTAINER_CONFIG ein und fügen die Configuration ID of the server GTM (the long letter/number code from the GTM server container settings) as its value.
Tragen Sie eine Variable RUN_AS_PREVIEW_SERVER mit dem Wert „true“ ein.
To repeat:
| CONTAINER_CONFIG | [Configuration ID of the server GTM] |
| RUN_AS_PREVIEW_SERVER | true |
Then check all the settings again very carefully and only then click on CREATE. The setup will take a few minutes.
Then copy the URL of the preview serverand save it again in your accompanying text file.

Tagging Server
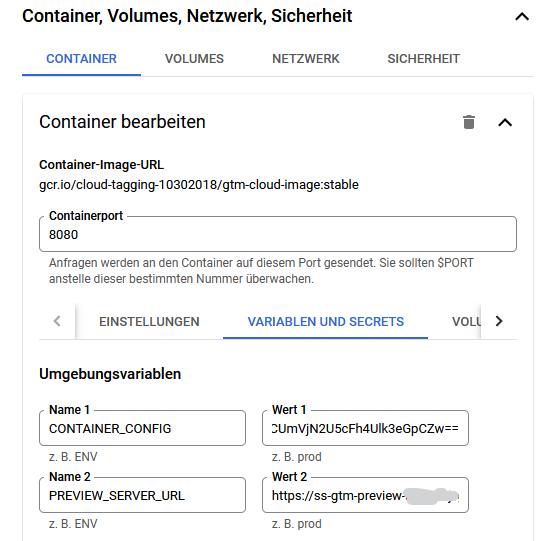
You need another Cloud Run service for this, again with the same Docker image as for the preview server:
gcr.io/cloud-tagging-10302018/gtm-cloud-image:stable
Service name: Tragen Sie eine beschreibende Bezeichnung ohne „-preview“ ein, z.B. ss-gtm
Region: europe-west1 (Belgium)
Authentication: Allow unauthenticated calls
Minimum number of instances: 1
Maximum number of instances: 10 (so halten Sie bei „normal“-besuchten Websites die Kosten im Griff)
Fold Containers, volumes, network, security on.
Unter „Variablen und Secrets“ tragen Sie ebenfalls wieder die Variable CONTAINER_CONFIG ein, und fügen Sie erneut die Configuration ID of the server GTM (the long letter/number code from the GTM server container settings) as its value.
Enter a variable PREVIEW_SERVER_URL with the value of the previously received Preview server URL in.
To repeat:
| CONTAINER_CONFIG | [Configuration ID of the server GTM] |
| PREVIEW_SERVER_URL | [the URL of the preview server] |
Then check all settings again very carefully and only then click on CREATE.
Copy the URL of the tagging server and save it in your accompanying text file. You will no longer need it to hand, but for the sake of completeness and for the record.
User-defined domain
Now add your tracking subdomain (metrics.yourdomain) to the services. This step has proven to be the trickiest in practice. It simply requires a little patience and possibly several attempts.
In the Cloud Run service, click on Manage user-defined domains and on Add assignment. Select here as a service the tagging server service, NICHT den Preview-Dienst. Klicken Sie dann auf „Cloud Run-Domainzuordnungen.

In the following screen, select the tracking subdomain you have already set up (e.g. metrics.yourdomain.com) aus. Sollte das noch nicht passiert sein, wählen Sie stattdessen „Neue Domain bestätigen …“ und beginnen den described below process, i.e. add your tracking subdomain as a custom domain to the Cloud Run service.
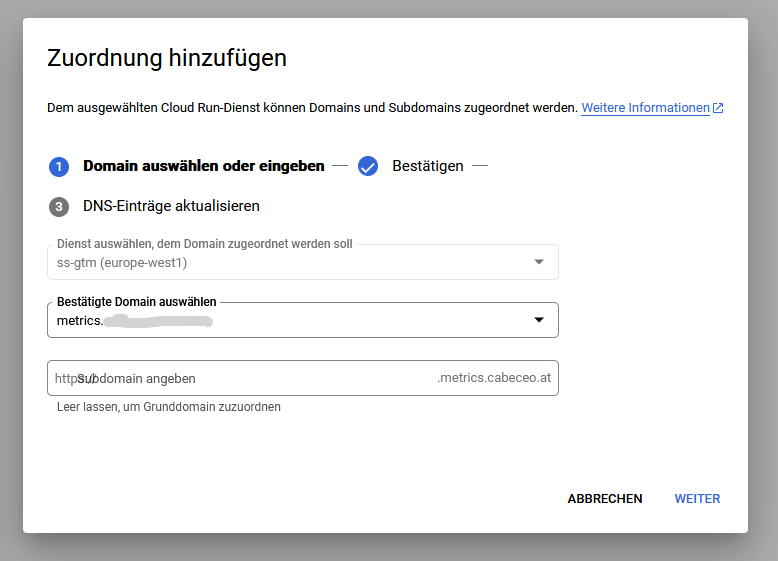
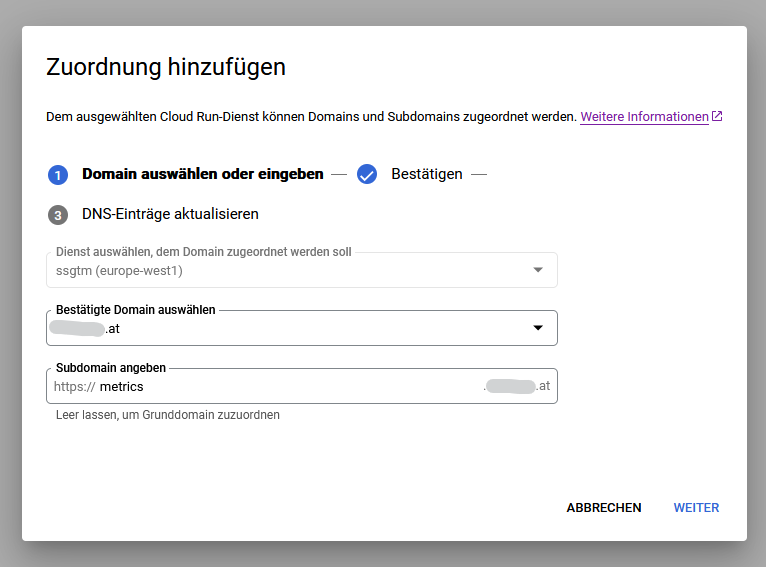
Click on DONE to return to the list of domain assignments.

Wait until the assignment is complete (no more rotating symbol visible), this will take a good 15 minutes or more.
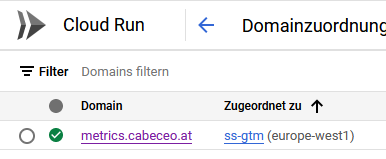
Selbst wenn Sie das Häkchen bereits sehen, werden Sie noch ein wenig zuwarten müssen. Machen Sie dazu folgenden Test. Rufen Sie Ihre Tracking-Subdomain mit einem angehängten „/healthy“ auf.
https://metrics.IhreDomain.com/healthy
Erst wenn Sie ein „ok“ als Ergebnis erhalten, scheint der Servercontainer fertig eingerichtet zu sein. Bevor das nicht der Fall ist, brauchen Sie nicht weitertun.
Add the URL of your tracking subdomain (in our example metrics.yourdomain.com) to the container settings of the server container in Google Tag Manager.
Tests / Preview
To see whether it really works, open the Preview of the web container. Öffnen Sie darin eine Seite Ihrer Website. Der Webcontainer Tag für GA4 sollte unter „Tags Fired“ erscheinen.

Switch back to the Tag Manager window of your browser, open the Server containerand then its Preview.
Switch to the page of the website you have already opened in your browser and reload it. Or you can load your website in a new browser window.
In the Preview of the server container you should now receive a result similar to the following. In the sidebar on the left, you should see at least one call of the type collect?v=2&tid=G-.... see.
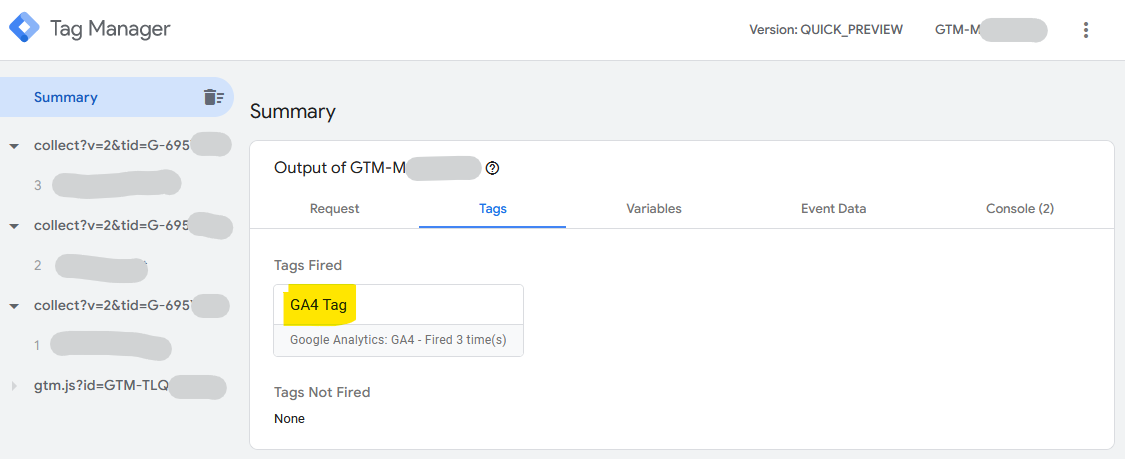
In the example, the GA4 client sends data to your Google Analytics 4 property.
Complete success!
Please note that the Real-time report in Google Analytics 4 wesentlich „zäher“ reagiert, als bei client-seitigem Tracking.
You have reached your goal!
And afterwards
Controls
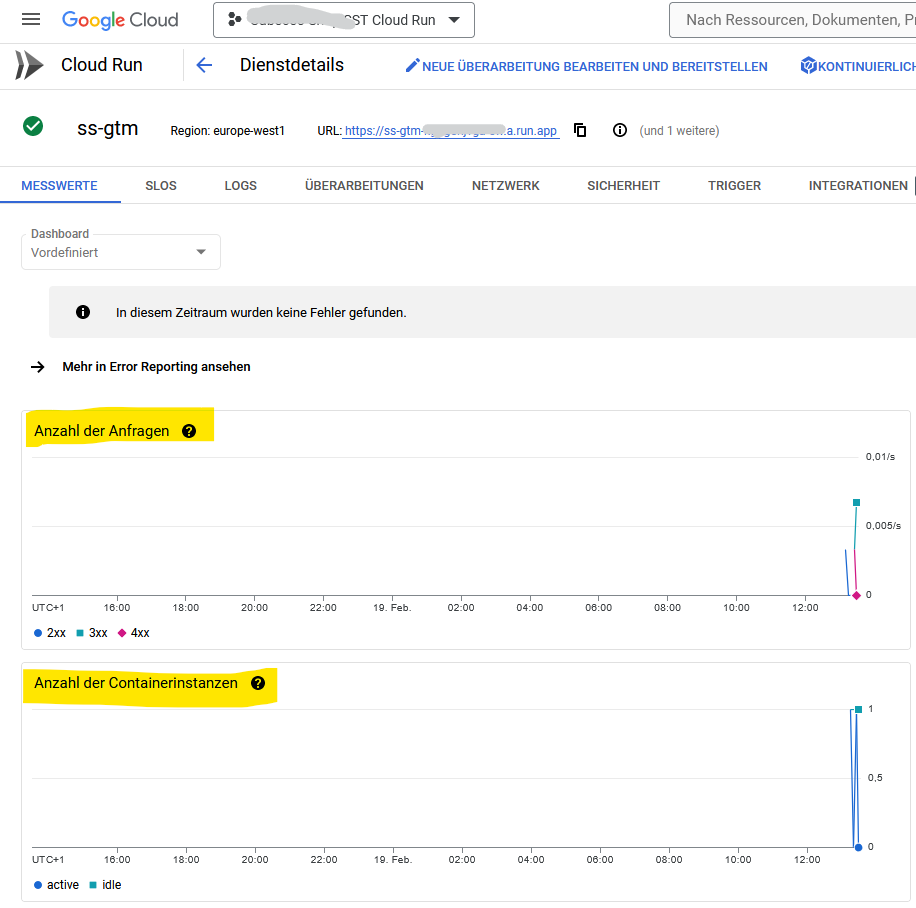
Under (Cloud Run) Service details / Measured values you can see the utilization of the server at any time.
Das erste Feld zeigt die „Anzahl der Anfragen“.
Ein weiteres Feld zeigt die „Anzahl der Container-Instanzen“. sie sollten diese Daten nach etwa einer Woche prüfen, um zu sehen, ob 10 Instanzen für Ihre Website tatsächlich notwendig sind, vielleicht kommen Sie mit weniger aus, oder benötigen doch mehr. Auch nachträglich lassen sich solche Einstellungen des Dienstes verändern (Edit service configuration).
Deactivate logging
To save costs, you should deactivate the logging service for the cloud project after some time - if everything is working. To do this, call up the Logs Router.
https://console.cloud.google.com/logs/router?hl=de
Click in the line with _Default under Name on the three-dot menu on the right, and select Deactivate sink.

You can stop logging at any time with Activate sink switch on again.
If necessary, regularly check the Costs in the Invoice account.
GA4 tags web and server in parallel
Run the original GA4 tag in the web container for a while in parallel with the new GA4 tag, which sends data to the server container. This allows you to see whether the data collection is working. However, you will notice that fewer new users are detected with server-side tracking. This is because server-side tracking is better at recognizing returning users.
If you are sure that everything is working, replace the Google Analytics 4 data stream measurement ID in your GA4 tags (web and server container) with the previously used measurement ID. From now on, the data collected with server-side tracking will end up in your usual GA4 property.
Excursus: Adding your own tracking subdomain to a Google Cloud service
Set up a separate subdomain for the tagging server
To the instructions on developers.google.com
When you set up a tagging server for the first time, it is hosted in a domain provided by the cloud provider (in our case, this is Google). In order for data to be sent to the server container in the first-party context (first-party cookie), your tagging server and your website must be on the same domain run.
We select the implementation option Subdomain from.
In the Google Cloud Console, call up the Settings (sidebar on the left, at the very bottom) the tab User-defined domains on. You must be in the project that corresponds to your container ID.
Wählen Sie „Benutzerdefinierte Domain hinzufügen“.
Im Dropdown wählen Sie „Neue Domain bestätigen …“, und tragen im Feld darunter eine Subdomain ein, die Sie dafür nutzen wollen. Vielfach nutzt man dazu eine selbst gewählte Subdomain namens metrics (others use data, ssgtm or similar). metrics is also used in this example.
First, you must authenticate yourself with Google to use the new subdomain.
They become Google Search Console in order to confirm this subdomain. If the domain has been confirmed on one of the variants offered there (I recommend the variant with the Entry in the DNS of your domainbecause you have to make further entries there straight away), you will return to the Google Cloud.
This authentication method also leads to a first entry in the DNS of the subdomain, a TXT entry. This has a value like:
google-site-verification=2ZKc6zIO......RcjzU
Sie sollten dann diese neue Subdomain (eventuell erst nach Klick auf „Domains aktualisieren“) auswählbar in der Dropdown-Liste sehen. Sie erhalten nach der Auswahl der Subdomain die weiteren nötigen Einträge für das Domain Name System (DNS) Ihrer Domain.
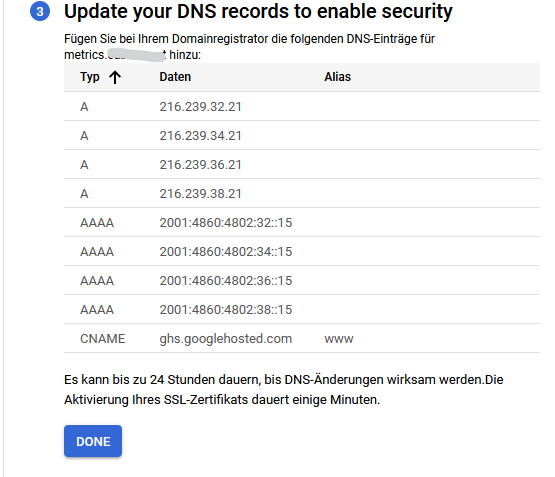
| Type | Data |
|---|---|
| A | 216.239.32.21 |
| A | 216.239.34.21 |
| A | 216.239.36.21 |
| A | 216.239.38.21 |
| AAAA | 2001:4860:4802:32::15 |
| AAAA | 2001:4860:4802:34::15 |
| AAAA | 2001:4860:4802:36::15 |
| AAAA | 2001:4860:4802:38::15 |
These A and AAAA entries are the same for everyone. Only the TXT entry of the Google Search Console has a google-site-verification= a different value.
Your turn
These instructions apply to using the Google Cloud to set up a tagging server. There are also solutions that are easier to implement, such as those from staple.io or taggrs.io. However, the running costs are higher with these providers. Billing is based on the number of GA4 events (events) sent, and you can quickly reach a cost range of 50.00/month or more. You can find out the specific costs for yourself by looking at the total number of GA4 events on your website in the last 30 days.
There may be errors in such an instruction monster. Please draw my attention to this in the comments. And let me know if you have succeeded in server-side tagging with the help of this article, among others.
Do you need support?
The E-Werkstatt online marketing agency team will be happy to assist you. You set up your own Google Cloud project and the billing account, and E-Werkstatt takes care of the rest.
Would you like to be informed quickly about new articles and more?
Then we recommend that you subscribe to our newsletter "Online Marketing News from E-Werkstatt".


Very good article! How can it be that you have roughly the same number of events in parallel operation with the server-side property, but more users? Perhaps hardly any bots are filtered out here?
Unfortunately, I'm not sure. With webside tracking, the user's browser is more involved, and you don't know which extensions could influence the tracking.
Thanks for the great article!
Could you please advise how to manage multiple domain in multiple countries for a brand that actually has one client GTM per country. brand.fr, brand.es, brand.ca…
Using cloud run and load balancer
Thanks
Sorry, but I can’t. It depends what you want to achieve. Everything different for other countries, e.g. GA4, Google Ads, Meta Pixel, conversion tracking, etc.?